Voltage control modifications
2018-02-25 electronics design
There's a recurring thread that comes up again and again in SDIY fora, where someone asks how to "mod" an existing device that is not voltage-controlled to give it a CV input. Sometimes this question is asked in relation to a specific product, in which case there's some possibility of having an intelligent discussion; but quite often it's framed more generally, with the poster hoping that there will be just one single, simple procedure applicable to all (or at least many) non-voltage-controlled modules to make them voltage controlled. In this article I'll talk about some of the issues underlying that kind of request, and how CV "mods" can and can't be done on different kinds of circuits.

If you read this article expecting a list of instructions along the lines of "drill a hole in the panel, install a jack, run a wire to here, and you're done," you should expect to be disappointed. In general no such procedure exists; there are a few rare cases I'll discuss in which something like that can be done after all, but usually, not. Maybe it's because of those rare exceptions that people think CV "mods" exist in general - if you see it done once, you may not realize that it can't be done every time. But it really depends on the circuit. So the first step in attempting to modify a device is to get the circuit (the schematic, and whatever other technical data is available). Without knowing the circuit you can't even answer the question of whether a modification is feasible, much less actually perform one.
I think a lot of the expectation that "mods" should always be possible also comes from fantasy panel designs. I'm reminded of being asked why I don't just add some skinny-shaft potentiometers to the Fixed Sine Bank to make the frequencies adjustable, because "There's plenty of space on the panel!" If you believe that electronics, like friendship, is magic and the circuitry behind the panel doesn't consume space or cost money, then it follows that the limiting factor on features is just how many things you can cram onto a panel, fingers be damned - and so a CV input is as easy to design as a manual control, and you can add either of them to an existing design just by drilling another hole. And it's easy to forget about what's behind the panel because the front of the panel is what you can see.
Meta-comment
If it were easy and cheap to change a given commercial product to be voltage-controlled, then the manufacturer could have already made the modification as a standard feature and they would have had a more valuable product at little or no extra cost, thus greater profit. So if they have not made it voltage-controlled already, there's probably a reason why not.
First the good news
If a circuit feature already is CV-controlled, it's usually not hard to put in an additional input for that same feature, with the resulting control value being the average or the sum of the CV inputs. For example, here's the input processing circuit for the Leapfrog Filter's cutoff frequency:
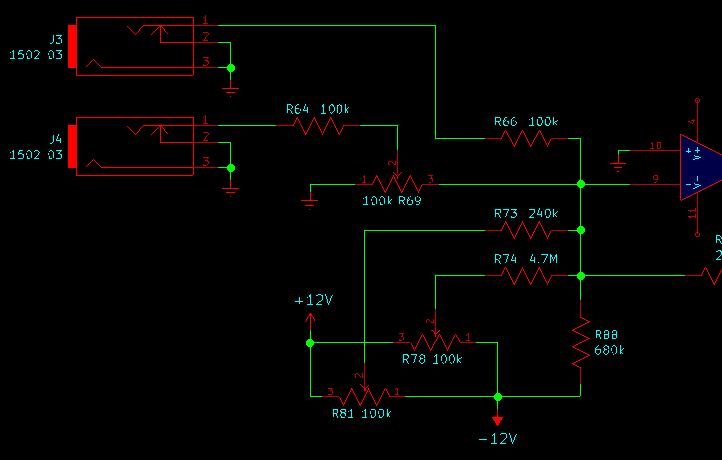
Five control sources (as well as the feedback loop) feed into the op amp's negative input, which is a virtual ground: V/oct tuning from J3, exponential FM from J4, coarse and fine manual tuning from R81 and R78 respectively, and a constant fixed offset from R88. If you wanted another attenuated exponential FM input, you could just duplicate the existing one (J4, R64, and R69) and connect the new components to pin 9 of the op amp. The circuit is trimmed elsewhere to account for any inaccuracy in R66, so if you wanted another V/oct input and you wanted to have the new one be as accurate as the existing one, then you'd need to make your new input separately trimmed, maybe by using a 91kΩ resistor plus a trimmer instead of just a fixed 100kΩ. That still isn't difficult. This kind of circuit is really the best case for voltage-control modifications, because you're not really adding voltage control, only adding another input to the existing voltage-control feature. But adding more voltage control to a feature that already has it isn't the frequently asked question; people asking about "mods" usually want to add voltage control where it doesn't already exist.
The next best case is that some circuits without a CV input really are voltage controlled after all, they just happen to use potentiometers to generate the control voltage without a jack socket for feeding it in from outside. For example, here's the sample application circuit from the Spin Semiconductor FV-1 DSP chip data sheet. Dirk Grappendorf has published a DIY Eurorack module design based closely on this circuit, and (though please note I do not have access to these schematics and cannot write authoritatively about how the commercial designers did or didn't protect the internal levels) the same chip also powers the Erica Pico DSP and Tiptop Z-DSP. More generally, many digital modules implement panel controls in a similar way: a pot generates a voltage which goes into an analog input of a microcontroller chip.
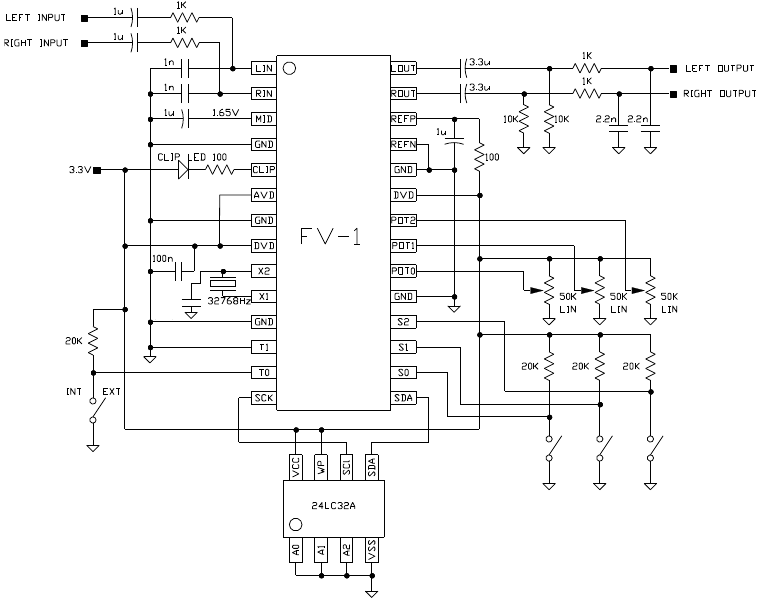
Suppose you have a module like Grappendorf's, where the DSP parameters are controlled by potentiometers with no jacks. Can you replace the potentiometers with jacks and have CV control? Yes, you can! But there's a catch.
Those potentiometers are connected between the FV-1's 3.3V power supply and ground. The control voltage range is from 0 to 3.3V. What happens if the chip sees a voltage outside that range? Well, if you just connect a wire from the chip to a jack socket that you install on the front panel, you will certainly find out what happens on out-of-range voltages, because synth users plug all kinds of strange things into front-panel jacks and you cannot stop them. Any front-panel jack can reasonably be expected to see voltages throughout the power supply range, which is ±12V for Eurorack.
Microcontrollers like the FV-1 cannot handle input voltages outside their own power supply ranges, which in this case would be 0 to 3.3V even if it's part of a module powered by ±12V. If you give it something far outside that range, like a +10V envelope output, in the best case there'll be protective diodes built into the chip which will divert the current more or less harmlessly into the chip's high or low power rail. Depending on how much current is available from the source, those built-in protective diodes may sooner or later overheat and destroy the chip. It's also possible that an excessive input voltage could cause the chip to "latch up" and just stop working until you turn the power off and then on again, at which time it may boot up normally again as if nothing had happened, or it may be dead. And even if the chip's built-in protections are completely effective, it certainly won't be able to process useful control changes between inputs of say 4V and 5V; anything outside the range of 0V to 3.3V will at best be treated as just equivalent to top or bottom of the range.
So if you want to "mod" the FV-1 example circuit to replace the potentiometers with voltage controls, you need to scale the input voltages from whatever range you're going to use (possibly 0V to 5V) to the 0...3.3V range, and also protect the chip from out-of-range voltages. A bare-minimum circuit for each CV input might look like the following.
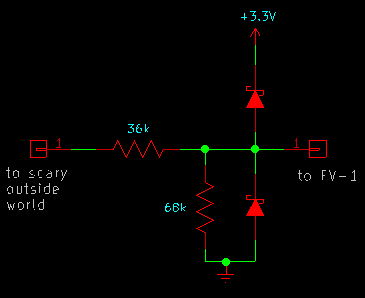
The two resistors scale 0...5V control inputs to the microcontroller's 0..3.3V range, as well as providing current limiting for the diodes and a 100kΩ input impedance, or near enough. Then the diodes (which should be Schottky types, as shown) prevent the voltage seen by the microcontroller from going more than one Schottky drop outside its power range. Within those limits its own protective diodes won't turn on (non-Schottky, larger drop), so there's no danger of overloading them. One subtlety is that the +3.3V bus needs to always have enough load on it that it can absorb any possible extra current coming from this input circuit without blowing out the regulator; that is no problem in this design because the FV-1 draws tens of milliamps all the time and the maximum current through the 36kΩ resistor on a +12V input is a fraction of a milliamp - but this is another issue you have to think about when designing an input circuit. Even if you were willing to settle for 0...3.3V as the input range, it wouldn't help much because you would still need at least one resistor and the two diodes for out-of-range input safety.
The bottom line here is that even though the FV-1 application circuit already is voltage-controlled anyway, adding a CV input that will be safe to really use in a modular synthesizer requires knowing the circuit and the capabilities of the components; doing some design work that is specific to the particular circuit being modified, not generic for just anything that happens to have a potentiometer in it; and adding several extra components. And this is still one of the easy cases.
It's not always so easy
Here's part of the schematic of the Thomas Henry VCF-1, which is a typical state-variable synth VCF with a nice clean design. He used CA3080 8-pin single OTA chips, which are nowadays unobtainable; a present-day version would probably use LM13700 OTAs, which come in 16-pin packages each containing two units. The resonance amount in this circuit is controlled by a 100kΩ panel pot. (Follow the link for the complete schematics and other build information.) Suppose someone wanted to "mod" this to have a control voltage input for the resonance amount.
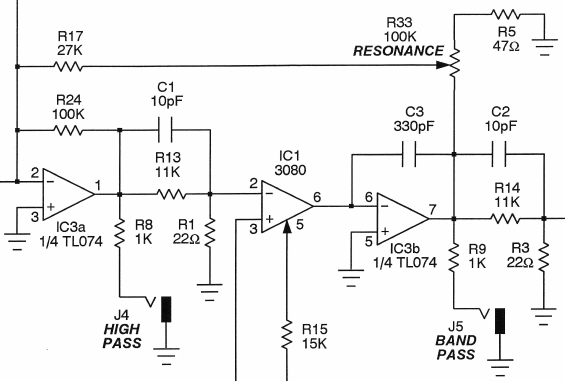
The "band pass" signal from IC3b goes through the panel control R33 and scaling resistor R17 to the virtual ground of op amp IC3a. As in the Leapfrog example, the signal is just going to a virtual ground, so it might seem that we could easily add a jack socket and resistor to the same virtual ground for putting in a CV; but doing that would actually create a CV-controlled DC offset, not a controlled amount of feedback. In order to control the amount of resonance, our CV shouldn't be applied directly, but should control the extent to which the signal makes it through the feedback circuit. What we need is exactly a VCA.
Building the basic VCF-1 without CV-controlled resonance requires five op amps and two OTAs; that's four chips (single op amp, quad op amp, two OTA chips) the way Thomas Henry designed it, or three if you use modern LM13700 OTA chips and get both OTAs in a single package. Adding voltage-controlled resonance requires another whole OTA chip (whether you have a use for the second OTA on the chip, or not) and a reasonable design would use at least one op amp (maybe also a discrete transistor or something, as a current source) to process the control voltage into a control current at the right level for the OTA's control input. You can probably get away with running the OTA output directly into the virtual ground at IC3a's input without needing yet another op amp.
If you were designing a CV-resonance filter from scratch, you could replace the lone single op amp chip in the original design with a dual to get one more op amp channel and not increase the parts count; but if you're "modding" an existing filter, you can't really do that and you must add another chip to get another op amp. So to a filter which was only three or four chips to begin with, we're adding two new chips and all their support components - increasing the total amount of circuitry by at least 50% just to get CV control of resonance. It's not just adding a jack socket.
For comparison, look at the Ray Wilson design for a very similar two-pole state-variable VCF with CV-controlled resonance; the voltage-controlled resonance circuit, nicely separated onto its own page of the schematic, is an LM13700 with one of its units unused, and a dual op amp chip - two added chips, as in my estimate, added onto four for all the rest of the filter.
It can be even worse
Here's a circuit for (one of the many versions of) the classic Fuzz Face guitar pedal - my redrawing of the schematic published by ElectroSmash. It has two knobs. Suppose we want to replace those by control voltage inputs.
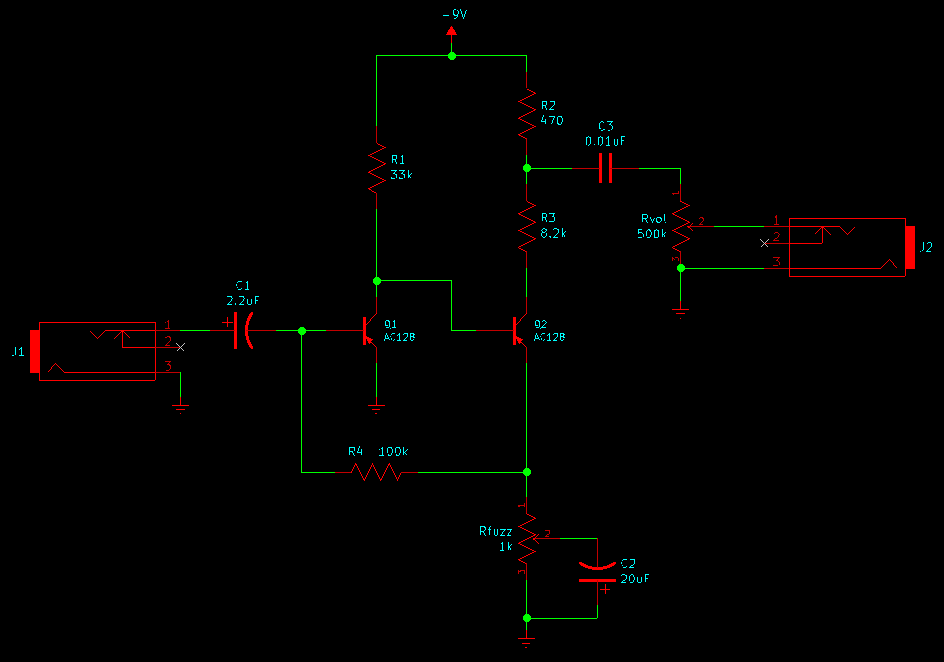
Take note of the fact that this is what's called a "positive ground" circuit: the main power supply is a negative voltage, voltages get more negative (not more positive) as we go upward on the schematic, and the most positive supply voltage is at ground potential. This kind of design is no longer often seen, but it was used in the original Fuzz Face because it made a lot of sense with the PNP germanium transistors that (although expensive and hard to find today) were the cheapest transistors available Back In The Day. I am assuming that if somebody wanted to "mod" this to operate at synthesizer instead of guitar levels, they're doing that separately; right here I'm only interested in the question of adding voltage control, which would be more or less the same either way.
The output level knob, Rvol, is relatively straightforward to replace because it's just an attenuator. We could replace it with a VCA as in the VCF-1 feedback circuit example above. That might typically mean adding one channel of an LM13700 for the VCA function and at least one op amp to process the input CV into a current for controlling the OTA. The output might be buffered with the buffer built into the LM13700; if not, it would probably need another op amp channel for buffering. That's at least 30 more transistors to add a seemingly-trivial feature to this two-transistor circuit, multiplying one measure of circuit complexity by 16; but in practice it's not really so bad because all those added transistors are in two compact IC packages.
The feedback/tone control Rfuzz is quite a bit more difficult to replace. Look at how it's used: it is not generating a voltage (like the FV-1 control pots) nor attenuating a signal (like Rvol), but controlling the extent to which the emitter of Q2 is exposed to the capacitance C2. The transistor Q2 is operating as a common-emitter amplifier and its gain is basically determined by the ratio of its collector resistance (R2 and R3, totalling 8.7kΩ) to its emitter resistance (Rfuzz and maybe C20). At DC, the capacitor is invisible and the gain is basically fixed at 8.7. But at AC, the capacitor looks like a low impedance, and as it bypasses more and more of Rfuzz, the AC gain increases. The circuit is designed so that it's easy to turn up the AC gain so far that the amplifier is trying to produce a much higher voltage than the power supply can support, and at that point it clips, creating the classic transistor-distortion sound. In order for this to work, we need to place a thing at the emitter of Q2 that will always look like a 1kΩ resistance to ground for DC, but will also look like a low, variable resistance between 1kΩ and 0, with some capacitive reactance mixed in, for AC.
A digi-pot might make the most sense here, but they're messy and they require computer control and it may not be easy to sell someone who thinks that the old-time analog sound is important, on the idea that they ought to add an entire digital microcontroller containing thousands of integrated MOSFETs just to make their two-transistor guitar pedal voltage-controlled. Digi-pots in the 1kΩ value range are not common but they do exist. I'll write more about digi-pots below. A more analog approach, palatable to the guitar-pedal audience, might use P-channel JFETs.
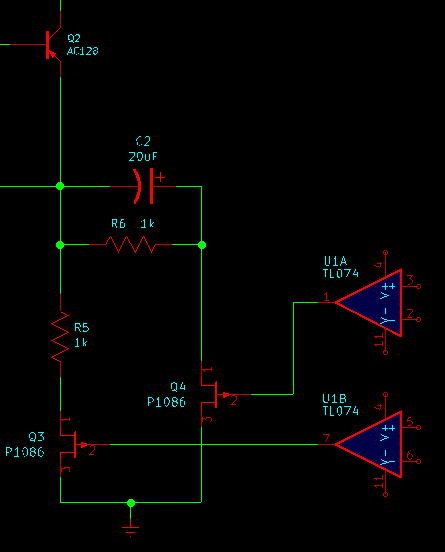
These JFETs turn "on" with a gate voltage near zero and "off" with a gate voltage at a relatively high positive value, bearing in mind they are handling relatively small negative-only signal voltages. I have drawn in two op amps to drive the JFET gates, but not the circuitry that controls the op amps. For minimum fuzz, U1A produces a high positive voltage, turning off Q4, and U1B produces a zero voltage, turning on Q3; the network as seen by Q2 looks much like a 1kΩ resistance to ground. For maximum fuzz, the op amps switch roles, Q3 is turned off and Q4 is turned on, and the network looks like 1kΩ resistance in parallel with the capacitor. So far this is just the same as turning the potentiometer Rfuzz to minimum or maximum.
For values in between, I have not worked out the details, but it should be possible for the op amps to apply low positive voltages to the two JFETs in such a way that each one is partially turned on and the overall network is equivalent to the original knob-controlled version with the knob at different intermediate settings. Getting it really right would be tricky, not least because of individual variation among JFETs of the same model, which would have to be trimmed out. A clever designer could probably achieve it with maybe one more op amp and maybe also the spare OTA channel left over from the output attenuation VCA. So we could reasonably guess that both modifications together (one OTA and one op amp for output attenuation, one OTA and three op amps for fuzz control) might be possible with two chips: an LM13700 dual OTA and a TL074 quad op amp. As well as the two P1086 JFETs, and miscellaneous passives including one or more trimmer pots. By the way, those JFETs are non-stock items priced at about Cad$3 each at Mouser - more expensive than either of the ICs. The cheaper P-channel JFETs I could easily find had too much resistance in the "on" state to acceptably simulate knob settings near the ends of the range, but it's quite possible that someone who spent more time on the design could get it to work with JFETs in the $0.50 range, or eliminate one of them and thus reduce both the JFET cost and the complexity of the drive circuitry.
Vactrols
One of the closest things we have to a generic add-voltage-control-to-anything technology is the "vactrol," a genericized trademark for a cadmium sulfide photoresistive optocoupler. The idea is that you have an LED set up to shine directly on a CdS photoresistor, inside a light-tight encapsulation. With no current through the LED, the photoresistor has high resistance, maybe in the MΩ range. When the LED lights up, its radiation causes the photosensitive material in the photoresistor to decrease in resistance. Since there is no electrical connection, only an exchange of light, between the LED and the photoresistor, this kind of component can be dropped into an existing circuit instead of or in parallel with almost any resistor to make it controlled by an external signal. It doesn't matter whether the resistor was generating a fixed voltage, presenting a varying impedance to different frequencies of AC, or what. A potentiometer can be substituted by two of these LED/photoresistor pairs with complementary drive signals. Even resistors that serve complicated roles (like the fuzz control in the Fuzz Face example) can be substituted cleanly with vactrols. However, there are a number of issues.
- Cadmium is highly toxic, and therefore banned for environmental reasons in many jurisdictions including all of the European Union. As a result, CdS photoresistors and the vactrols containing them cannot legally be built into commercial products that will be sold in Europe or other places with serious environmental-protection laws.
- Because vactrols cannot legally be sold worldwide and were always something of a niche product anyway, it is no longer really commercially viable to manufacture vactrols at all, and so if you want to buy them you have to buy "vintage" leftovers from the old days, deal with the few boutique manufacturers who still make them for exotic applications in places where they're still legal, or make your own vactrols by hand from LEDs, heat shrink tubing, and naked CdS photoresistors (also banned, but easier to obtain than complete vactrols because they're less of a niche product).
- Quality control on photoresistors is difficult, with the result that any two individual vactrols of the same model may have significantly different resistance/current response. This makes it hard to achieve consistent results when you build a vactrol circuit more than once.
- The available resistance values are limited and may not be the ones you need for the circuit you want to control.
- After the light turns off it takes some time (a matter of milliseconds, but this parameter is also wildly variable) for the CdS photoresistive material to return to its "dark" resistance value. That limits the response speed. Some people consider the delay to introduce a desirable "organic" element in the sound, but you'd better like it because you cannot prevent it from happening.
- Although people try, it is not really possible to get good results from just plugging a control voltage directly into the vactrol LED through a current-limiting resistor. To make it work properly you need a constant-current drive circuit, which basically requires an op amp.
Because of all these considerations, it's hard to recommend the use of vactrols on any basis that is intended to continue into the future. I can't realistically use them in any of my commercial products even though they are still legal in Canada, and Doepfer (located in Europe) have long since discontinued their A-101-9 "Universal Vactrol" module. It remains that a hobbyist doing a one-off home "mod" might be able to get something sort of working with a vactrol in a circuit that would otherwise be difficult to put under voltage control.
Digi-pots
Digi-pots, or more formally digital potentiometers, are meant to serve as a drop-in solution for computer control of analog circuitry. Analog Devices manufactures a range of them. The underlying technology is similar to that of a multiplying digital-analog converter: there's a network of resistors built into a chip along with a bunch of CMOS analog switches, and a digital control circuit turns the switches on and off in such a way that the overall network presents resistance at the output terminals equivalent to what a potentiometer would look like with its shaft turned to different positions. Just like a real electromechanical potentiometer, it can be used in many roles including generating a voltage, attenuating a signal, mixing two signals, or doing some complicated impedance-related thing.
The control circuit is usually meant to be driven by serial commands (I2C or similar) from a microcontroller, but there are also digi-pot chips designed to connect to "up" and "down" pushbuttons without a microcontroller. It wouldn't be hard to adapt the output of a rotary encoder to produce "up" and "down" signals for the pushbutton digi-pot. To drive it with an analog control voltage, you would need to have an analog input on your microcontroller and translate that into serial commands. Digi-pots often also have a tiny bit of flash memory built in (and accessible to the computer through the same serial interface), for remembering their settings through power-off cycles.
Using an analog-to-digital converter, an entire digital computer, some flash memory, and a network of dozens to hundreds of resistors and switches, all to replace one simple electromechanical device, is frankly insane. But this crazy digital world we've built for ourselves is such that it actually makes sense. A low-end digi-pot may cost less than a decent-quality electromechanical potentiometer, and if you already have a microcontroller in your system anyway, it may be really convenient to just hang another device off your I2C bus and instantly have control of an analog system. All in all, these are the closest thing we have to a modern replacement for the old-fashioned vactrols.
There are a number of limitations. Biggest, of course, is the need to have a digital control system. As well as imposing real engineering constraints on other things that must be in the system to make the digi-pot work, there's also an issue of taste: many people suffer from irrational aversion to all things digital and will insist that anything with a microcontroller in it must sound bad even though they cannot tell the difference in double-blind listening tests, and so whoever builds a digital device into a synth module faces some marketing issues. Also, the resolution is typically only seven or eight bits (128 or 256 distinct steps). Higher-resolution digi-pots exist but their prices quickly increase, and with low resolution, especially on relatively slow things like CV inputs with LFOs plugged into them, there may be audible "zipper" artifacts as the digi-pot follows the voltage.
The bottom line on voltage control "mods" is that there's really no such thing: what you are doing is designing a new circuit with the features you want. If you're lucky, the voltage-controlled version will differ from the original only by a few components and you can meaningfully tack them on without many other changes. If you're not so lucky, you are basically just building a new system with some components of the old one and (possibly very many) new components. It's not unusual for the parts added to do the voltage control, to be much bigger and more complicated than the entire original circuit. Nonetheless, in some cases there are things that can be done easily, and I've reviewed some of them here.
◀ PREV A note on RSS || Modular synthesis intro, part 8: State-variable filters NEXT ▶
